Keeping your vape tank and coil clean

Our vapes don’t stick around forever. Parts may eventually wear out and need to be replaced, or you may decide you want an upgrade to your current rig. Quality parts will last a long time, but the one part that needs replacing most often will be your coils. They may last you a few weeks to a couple of months. depending on the type, usage, and care. Keeping a clean machine may save you a trip to the vape shop a couple of times a year.
Your tank and coil are where the magic happens, so they take the brunt of the abuse. You are storing and heating sweet e-liquids in there, so you should treat it as such and keep them clean. It’s not particularly tough, and will even take your flavor experience to the next level over the life of each coil. Vaping with a dirty coil will eventually lead to poor performance and poor taste. The accumulated residue on the coil will also affect the vapor output, leaving much to be desired out of the new e-liquid you just purchased. Let’s take a look at keeping your vape’s performance up to par with a simple clean.
Cleaning the Tank
Keeping a clean vape tank is a great idea for a number of reasons. It keeps residue from building up and causing discolorations, and it keeps unwanted flavors from sticking around. If you are fond of changing up your flavors, you won’t really want the new and old mixing, tainting the taste of your new e-liquid. It’s a good thing cleaning it is a simple process.
There are a number of different solutions people like to clean their vapes with, but the real difference there comes down to personal preference and how dirty your tank is, to begin with. Whatever your preferred cleaning solution, the process is pretty much the same.
First, disassemble the tank and remove the coil. If the coil is truly burnt out, you can toss it. If it still has some life left and you would like to clean it, set it aside for separate cleaning. Make sure to empty any remaining e-liquid from each part, and place all the components into a small to a medium-sized bowl. This will help you keep them together, and provide a small washtub for your tank if it’s on the dirtier side, and you want to use a more powerful cleaning agent.
If you are working with a relatively clean vape tank, you can simply run each piece under warm or hot water to rinse off any residue. Remember to place a strainer in the drain to keep any dropped pieces from being donated to the local river. If you have sensitive hands, a pair of cleaning gloves may help you tolerate higher temps, achieving more with this simple rinse. Dry each piece after rinsing with a paper towel, and set aside to air dry completely.
If you need a little more cleaning power, you can soak your parts in very hot water before rinsing. You can either fill your bowl with water and put it in the microwave for a couple minutes(check the bottom of your bowl to make sure it’s microwave safe) or you can heat a tea kettle and fill the bowl with hot water. Let your parts soak in the hot water until it has cooled enough to handle the parts, and repeat the rinse from before, making sure to wipe away all water and residue with a paper towel. Set the parts out to air dry, and you should be good.
Popular Cleaning Agent Options
When our tanks get exceptionally dirty, sometimes it takes more than just hot water to get them clean. Soaking your tank’s components in a cleaning agent can break down more of the residue than hot water alone. There are a number of different popular solutions you can make with items you already have around the house.
- Dish Soap – Sometimes all you need is a little dish soap. Adding a squirt to your bowl of hot water will boost the water’s cutting power. There’s a reason rescuers use it to clean up after oil spills. The stuff works.
- Baking Soda – Baking soda has been a popular cleaning agent since the beginning of time. Not only is it a powerful, natural grease and oil cutting agent, it is also a fantastic deodorizer. Soaking your components in a solution of one tablespoon baking soda to one cup of hot water will leave your tank clean and odorless, ready for your next flavor adventure.
- Vinegar – Vinegar is another popular cleaning agent that people turn to for added cleaning power in various applications. You can use vinegar alone or diluted in hot water, but vinegar is also capable of leaving lingering smells, so watch the clock if you are soaking in a strong solution. Also, you may want to wear those gloves if you use this method because vinegar can be irritating to the skin.
If you decide to use a cleaning agent, make sure you rinse and dry the components well after soaking so you don’t end up with any lingering taste from the agent. I’m sure vinegar doesn’t mix particularly well with many of your favorite flavors.
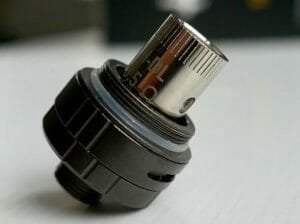
Cleaning the Coil
Now that your tank is drying in the glorious sunlight, it’s time to tackle the coil. Replacing the coil every time it gets dirty will add up, so stretch its life with a quick clean. While cleaning a replaceable coil may be more time consuming than it’s worth, cleaning a rebuildable coil is definitely worth the small time investment.
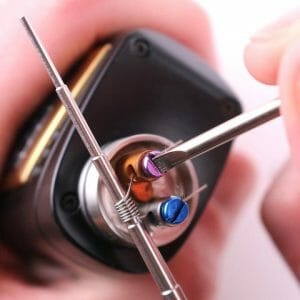
- First, make sure to remove any excess e-liquid from the coil. You can blow it out and gently wipe it dry with a paper towel or hand towel. If your wick is removable, take it out now. Add a little water if it helps remove the old liquid.
- Now that the wick is out and the coil is exposed, soak it in a potable solvent like vinegar, ethanol, or cheap, unflavored vodka. Be sure not to use rubbing alcohol. Any solvent you use should be drinkable, however unpleasant that might be. Let the coil soak for a few hours.
- Take a nap or watch a long movie, if you like.
- Now that you’ve finished soaking your coil, rinse it off well in your sink. Again, don’t forget the strainer in your drain to prevent losing your afternoon down the drain. While you are rinsing, you can gently brush the coil clean with a toothbrush or other soft-bristled brush to remove anything that is still hanging on.
- Many people prefer to follow the sink rinse with a distilled water rinse. Using distilled water after the sink rinse will ensure that no minerals are left behind from the tap water.
- Now that you’ve got a clean vape coil, set it out to dry. It may take awhile to dry, because the wick holds onto moisture longer than the coil. If you removed your wick prior to cleaning, It may dry faster in the open, speeding the process a little. Heat and sunshine are also good at speeding drying time.
Once everything has had a chance to dry, it’s time to reassemble your tank and coil. While cleaning your coils won’t make them last forever, they will extend the life and performance. Once you see the difference a clean tank and coil makes for yourself, it’ll likely land a recurring spot on your calendar.